1. Setting Lockdown Mode for publishing sites
When implementing external facing sites, it is
critical that administrators be aware of what users can do under given
conditions.
A common scenario on a site is to have a blog or
article page and then have a comments section below it. In the
SharePoint terminology, this implies that anonymous users can write back
to a list. Think about this, a viewer of your site has the ability to
add an item to a list (in the form of a comment).
By default, if the root site is a blog site,
anonymous users can add comments. However, if a site collection is based
on the publishing portal, they will not be able to add comments or
articles to a blog that lives under the site collection.
In this recipe, we will see how to manipulate the feature that will enable anonymous users to add comments to a blog or article.
Getting ready
You must have access to one of the servers running PowerShell 2.0 and be a member of the WSS_ADMIN_WPG on the local computer. You must also be a member of the SharePoint_Shell_Access role on the configuration database (SQL role).
There must be a site created, based on the publishing portal template.
How to do it...
Click on the Start button on the web front end.
Under All Programs, navigate to the Microsoft SharePoint 2010 Products folder.
Right-click on the SharePoint 2010 Management Shell option and click Run as Administrator. The PowerShell console will appear.
Type the following command into the console window:
$ldstatus = get-spfeature viewformpageslockdown
Disable-spfeature $ldstatus -url http://sitecollectionURL
How it works...
SharePoint 2010 has a feature called ViewFormPagesLockdown.&;
This feature prevents or enables anonymous users to gain access to
standard list forms and particular sections of your site. It is
automatically turned on for publishing sites.
Anonymous users' rights are determined by the Limited
Access permission level. Limited Access cannot be assigned to a user or
group directly. If you have a subsite that you break permission on and
give a user access, that user needs some type of access to the root
site. This is done through Limited Access permissions.
By using PowerShell as shown in the preceding recipe, the ViewFormPagesLockdown feature is disabled at the site collection level. Now anonymous users can add comments to a blog or article.
There's more...
Using PowerShell, an administrator can determine if lockdown is enabled on the site, with the help of the following command:
Get-spfeature -site http://sitecollectionurl
A list of features is displayed. If ViewFormPagesLockDown is shown in the list, it is enabled.
2. Configuring Site Collection audit settings
Often in a SharePoint site, it is important to know
who is doing what and when. For instance, in a publishing site,
sometimes users do things they don't mean to do and it is important to
audit these events.
In many cases, it is mandatory to be able to track
what happens to a document — especially in the case of sensitive company
information, information related to ISO certifications, or some other
type of industry standard.
In this recipe, we will show how to enable the
settings at a site collection level so that all actions may be tracked.
These include checking in a document, checking out documents, deletes,
additions, and modifications to items.
Getting ready
You must have site collection owner privileges.
How to do it...
Navigate to the desired team site, which is the root site collection.
Click on Site Actions and then Site Settings.
Under Site Collection Administration, click Site collection audit settings.
The following form will be displayed:
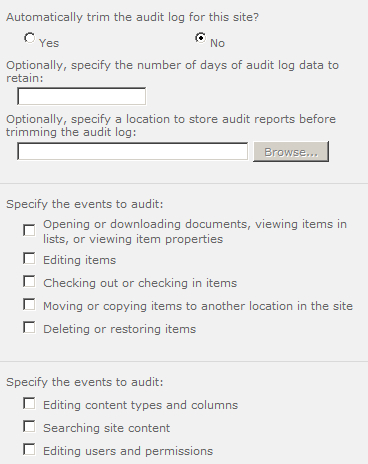
Fill the form as follows:
Leave the default as No under Audit log trimming.
Under Specify the events to audit (for documents and items), select all of the checkboxes.
Under Specify the events to audit (for lists, libraries, and sites), check all of the boxes.
Click OK.
How it works...
The first section is for audit log trimming. When
creating an audit trail in our recipe, every event is tracked and logged
for every user and process. The audit log can quickly fill up the space
on your drive and in your database. As an administrator, it is crucial
to be aware of this.
Specifying the number of days to retain is a smart
way to trim your log. If you do need it, there is an option to store the
audit log before it is trimmed.
The second section pertains to documents and items.
In many cases it is not necessary to select all of the options.
Sometimes the site collection administrator just needs to track when
documents are deleted. Again, choosing all of the options fills up the
audit log quickly.
The last section pertains to site content, users, and
permissions. SharePoint is now a repository where mission-critical data
is held, and user permissions are paramount to passing an audit. It may
be necessary to select only the checkbox, so that the auditors have the
evidence they need to ensure the compliance of your organization to set
rules.
3. Accessing security policy reports
In the previous recipe, we configured the auditing
settings. We need to read this information and evaluate what is
happening on our site.
The security policy reports show us what is going on in our sites. In this recipe, we will show how to run the reports.
Getting ready
You must have site collection owner privileges.
How to do it...
Navigate to the desired team site, which is the root site collection.
Click on Site Actions and then Site Settings.
Under Site Collection Administration, click Audit log reports.
Scroll to the bottom of the resulting screen. It should be similar to the following screenshot:

A form pops up with a text box where we must put a save location for the report. Using the Browse button, navigate to Shared Documents.
A screen will appear with a link to the generated report, click this link. The report will appear in the Excel format.
How it works...
These reports are fed by the previous recipe options.
When the report is generated, it is saved to the selected location, in
the Excel format, and is date and time stamped.
You can navigate to that location, select the report, and view it.